Change to Yellow interior stitching

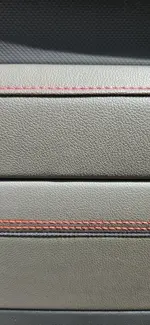
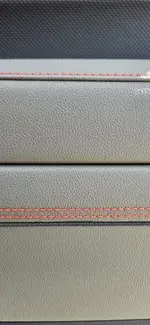
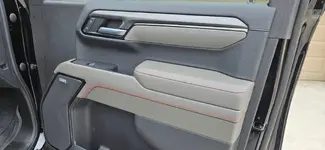
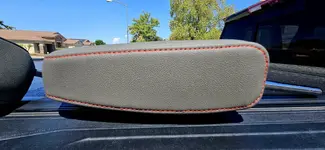
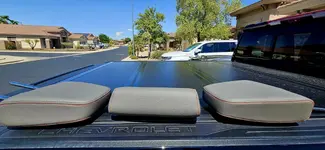
I pulled my headrests and did the red fabric dye on the chartreuse stitching. Started with rear middle seat just to be sure, but it convinced me quickly that was the only way to go.

I made two passes on the stitching and did two applications to get a good deep red color. I would do about 6 to 9 inches at a time and then wipe off excess when it was still wet. Comes right off and stitching stays red.

Pictures still look a little light, but it's a deep red.

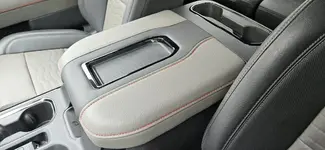
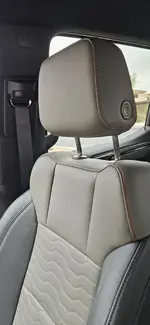
I think you are gonna need three pens like the one I'm using, as the pointed tip is gone after headrests and doesn't get into the dimples easy. Still plenty of ink tho. There's a lot of stitching on dash, seats and door trim.

I think you could do other colors too, maybe orange, blue, black or gray.
 

Attachments

  • 20230909_114714.jpg
    20230909_114714.jpg
    273.2 KB · Views: 88
  • 20230909_114701.jpg
    20230909_114701.jpg
    303.1 KB · Views: 88
Last edited:
I finished up the thread and here's my observations. Overall the red thread looks great. Here's some observations on a 2 hour job requiring 4 markers and 2 to 3 coats.

The marker leaves a nice deep red on the thread for seats, headrests, and center console. This is due to the stitching being sunken into the material and the thread taking color deep into the hole punch.

Dash stitching looks pretty good, but stitching surface is hard and it hard to get marker deep into stitch holes. Use a fresh sharp marker to get dye into holes or you'll see yellow specs.

The door panel stitching is harder to color. It seems like it's waxed as it doesn’t absorb the colored dye easily. Also the stitched panel is a harder , maybe slightly porous material that seems to absorb a little of the red, so hard to wipe clean. A very lightly damp cloth will help, but also pulled dye from thread. Not really satisfied with the door panel stitching. I'm gonna do a third pass and use a different brand marker to see if I can get a deeper scarlet red.
Thanks for posting this! I have never liked the chartreuse colored stitching and wish they’d have made an option to pick from other colors. Anyway, now I know it can be tackled.
 
  • Like
Reactions: AXE
Here's a couple pictures of the door stitching on opposite feont doors. The double line of stitches on door panel is the hardest to get deep color, armrest not too bad. Did one more pass and let it sit a couple hours before wiping. Might have helped thread color retention, but it was hard to wipe plastic clean after sitting. Several passes with lightly dampened cotton cloth.
 

Attachments

  • 20230922_120144.jpg
    20230922_120144.jpg
    298.3 KB · Views: 56
  • 20230922_115643.jpg
    20230922_115643.jpg
    258.7 KB · Views: 56
I finished up the thread and here's my observations. Overall the red thread looks great. Here's some observations on a 2 hour job requiring 4 markers and 2 to 3 coats.

The marker leaves a nice deep red on the thread for seats, headrests, and center console. This is due to the stitching being sunken into the material and the thread taking color deep into the hole punch.

Dash stitching looks pretty good, but stitching surface is hard and it hard to get marker deep into stitch holes. Use a fresh sharp marker to get dye into holes or you'll see yellow specs.

The door panel stitching is harder to color. It seems like it's waxed as it doesn’t absorb the colored dye easily. Also the stitched panel is a harder , maybe slightly porous material that seems to absorb a little of the red, so hard to wipe clean. A very lightly damp cloth will help, but also pulled dye from thread. Not really satisfied with the door panel stitching. I'm gonna do a third pass and use a different brand marker to see if I can get a deeper scarlet red.
pics???
 
  • Like
Reactions: AXE
Can't really get good pics inside cab due to limited light and shadows.. The ones I've posted are about as good as it gets. It looks nice within about 2 to 3 feet, but much further away and the red blends with gray. You don't get much effect unless your in the cab.
 
Had some cloud cover this morning. These pictures look a little better, but red still looks deeper in person.
 

Attachments

  • 20230923_095407.jpg
    20230923_095407.jpg
    314.1 KB · Views: 60
  • 20230923_095433.jpg
    20230923_095433.jpg
    247.9 KB · Views: 60
  • 20230923_095619.jpg
    20230923_095619.jpg
    214 KB · Views: 60

Most Member Reactions

Latest Posts

Back
Top