Q's ZR2 Mods

Just finished installing the Bushwacker Trail Armor Rocker Panel and Sill Plate set. They've been sitting in their box since before Christmas. Finally got tired of moving the box around in my tool room today. I'ma little mixed on the out come of the install. It would have been nice if the split between the front door and back door lined up with the actual door split. The fit and finish is good, just wished they had also covered the gap between the front fender and the from door.

Before
IMG_4366.jpg

After
IMG_4367.jpg

Driver's Door
IMG_4370.jpg

Passenger Rear Door
IMG_4371.jpg
 
Just finished installing the Bushwacker Trail Armor Rocker Panel and Sill Plate set. They've been sitting in their box since before Christmas. Finally got tired of moving the box around in my tool room today. I'ma little mixed on the out come of the install. It would have been nice if the split between the front door and back door lined up with the actual door split. The fit and finish is good, just wished they had also covered the gap between the front fender and the from door.

Before
View attachment 1962
After
View attachment 1961
Driver's Door
View attachment 1960
Passenger Rear Door
View attachment 1959
I like those! Maybe add a piece of black vinyl to areas where white is showing through?
 
Unfortunately, no. I removed the red 2 from the original emblems. I removed the 3m tape from the back side and used a small straight slot screwdriver to gently push the tabs through. I used small amount of silicone to keep the red 2 in the new black emblem.View attachment 1108
Were you able to re-use the tape on the black emblems once you switched out?
 
Were you able to re-use the tape on the black emblems once you switched out?
I only removed the tape on the 2. Once the switch was done I applied new 3M tape and trimmed it to fit.
 
This is the the 3M Tape I used. It can also often be found at Wal-Mart and most auto parts stores.
It is a pain in the ass getting all that adhesive off the truck.

If anyone else is going to tackle this: the emblems are marked L & R, though I did not see a difference in them. Also be patient when pushing the old red 2 out as you can still use the clips on the new black emblem if you do not dis form them too badly.
 

Attachments

  • A46EFD9C-6027-46C3-BFA0-A40AAEF82A30.jpeg
    A46EFD9C-6027-46C3-BFA0-A40AAEF82A30.jpeg
    216.9 KB · Views: 58
It is a pain in the ass getting all that adhesive off the truck.

If anyone else is going to tackle this: the emblems are marked L & R, though I did not see a difference in them. Also be patient when pushing the old red 2 out as you can still use the clips on the new black emblem if you do not dis form them too badly.
Yeah, the hardest part is cleaning the old stuff off the truck.

As for the left and right differences. Don’t try to to put the right side’s 2 in the left side emblem. The tabs are different on the 2 for both sides. I found out so you don’t have too 😂
 
Really have been enjoying this truck. The ride is awesome for what the truck is, and having driven a lowered 4th generation single cab Ram R/T for the past 8 years I think I'll leave the suspension alone on the ZR2. The ZR2 was my retirement gift to myself. Since mid June I have done the following modifications.

Xpel UltimatePlus Paint Protection Film entire front end
CeramicPro Gold Package Ceramic coating
Xpel PrimeXR Plus window tint doors and windshield
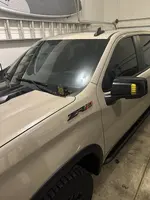
Chevrolet Emblem mirror puddle lights
BedRug bed floor cover
Gator tri-fold bed cover
Tailgate Step Lighting
Black Chevrolet wheel center caps
Black McGard lugnuts and lock
MGP red ZR2 caliper covers
Blendmount radar detector mount for my MAX360 and M2 dash camera
Kicker subwoofer
Console safe
J&L Catch Can
K&N Drop in replacement filter

Also covered the center console lid for my beagle buddy that like to ride on the console so he can see where we're going.
Q , IMG 3322, how did you cut the factory carpet box? I've got mine upright in the garage because I haven't determined how I'm going to cut it to make it look factory like yours.

Beautiful work by the way, looks mint.
 
As an Amazon Associate we earn from qualifying purchases.
Q , IMG 3322, how did you cut the factory carpet box? I've got mine upright in the garage because I haven't determined how I'm going to cut it to make it look factory like yours.

Beautiful work by the way, looks mint.
Haven’t done mine yet either.

I can’t find the YouTube video, but I’m pretty sure it was cutable with a utility knife. If I can find it, I’ll post a link
 
Q , IMG 3322, how did you cut the factory carpet box? I've got mine upright in the garage because I haven't determined how I'm going to cut it to make it look factory like yours.

Beautiful work by the way, looks mint.
Thanks @R I G I cut the under-seat storage tray with aviation / tin snips and a utility knife. I based my measurements off the studs that hold the jack.
 
Got some new 6.2L hood emblems to look more like the the blacked out ZR2 ones. They are made on a black stainless steel with red fill. The place I ordered from offers different colors. I CAN NOT say I highly recommend the company that makes them. I placed an order at the beginning of February using a credit card and never heard from them. They don’t respond to emails or messenger. However, they do respond via eBay🤷🏻‍♂️. Did a reversal on the first order and did a second order and paid via PayPal on their website and received my order in 10-15 day window. I’ll provide a link where I ordered them from, but highly suggest if you do order, pay via PayPal.

EmblemPros 6.2L emblems
Image for comparison only
1678828668256.jpeg


1678828690432.jpeg
 
Finally got around to the front emblem. I used red reflective tape to make the 2 red. There are no clips holding it on, just 3m tape. There are two posts on the back to help with placement. Now to platsi dip the bow ties.


View attachment 1111
Did you remove the ZR2 badge, or apply the tape with the badge installed?
 
Been a while since I’ve added to this thread. I’ve added small things here and there. Today I got my Rock Trix wheels installed. They are 18X9, -12 offset. I chose to keep the GoodYears for a bit longer.
IMG_0396.jpeg
IMG_0397.jpeg
IMG_0394.jpeg
 

Most Member Reactions

Back
Top